Unit 1
Measuring and marking
Read a ruler to the millimetre, mark a line you can trust, and cut card and thin wood to the size you meant.
Read
Measure twice, cut once
Arjun is making a bookmark for his sister. He needs a strip of card exactly 15 cm long. He measures, draws a line, and cuts. Then he lays it next to his sister's book. It is 14 cm. The strip is too short, and the card is already cut. There is no way to stick a piece back on and make it look right.
Where did Arjun go wrong? Nothing was wrong with his scissors. The mistake happened before the cut, in the measuring and marking. This lesson is about making that part so careful that the cut is the easy bit.
Carpenters, tailors and bakers around the world say the same thing in different words: measure twice, cut once. A second look costs ten seconds. A cut cannot be undone.
Reading a ruler
A school ruler usually has two scales. We will use the centimetre side.
- The long lines with numbers are centimetres (cm).
- Between two numbers there are ten small gaps. Each small gap is one millimetre (mm).
- So , and 3 mm is cm.
- The line halfway between two numbers is a little longer. That is 5 mm, or cm.
Example. A pencil ends on the 4th small line after the 12. That is 12 cm and 4 mm. We write it as cm, or as 124 mm.
Start at zero (or know where you started)
The most common mistake is not reading the numbers but starting in the wrong place.
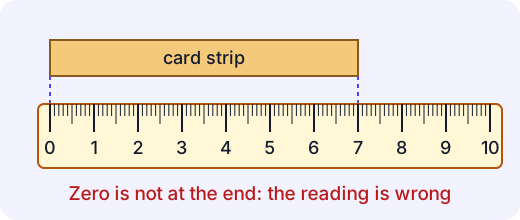
Put the 0 line exactly at one end of the thing you are measuring. Then the line where the other end lands tells you the length.
Sometimes the end of a ruler is worn or chipped, or the zero is a little way in from the edge. Then start from the 1 cm line on purpose, and remember to take 1 cm away at the end.
Example. A stick starts at the 1 cm line and ends at the 12.5 cm line. Its length is not 12.5 cm. It is cm.
Try it: Measure your pencil twice. The second time, start at the 2 cm line. Do both ways give the same length once you subtract?
Marking so the line can be trusted
A good mark is small and thin, so you know exactly where it means.
- Use a sharp pencil. A blunt pencil draws a line 1 mm wide. That is a whole millimetre of doubt.
- Look straight down at the ruler, with your eye above the line you are reading. If you look from the side, the ruler seems to point somewhere else (this is called parallax).
- Make a small V (or a tiny tick) with its point at the measurement, rather than a dot. A dot hides where its middle is.
- Join up with a straight line. Hold the ruler firmly against the edge and draw the line across. To make the line square to the edge, a set square (or the corner of a book) helps.
- Mark the waste. Put a small X on the side of the line that will be thrown away. This saves you from keeping the wrong half.
Cutting to the line
Where exactly do you cut? A scissor or saw has a thickness. If you cut on the middle of your line, you cut away half the line and the piece comes out a bit small. Cut so that the line stays on the piece you keep, with the blade on the waste side.
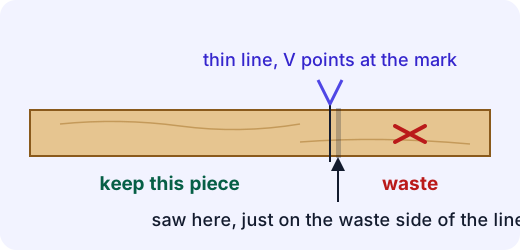
A saw is thicker than a scissor blade. It turns a thin slice of wood into dust. This slice is called the kerf, and for a small hand saw it is about 2 mm. That matters when you plan several pieces.
Example. You want three pieces of 12 cm, 8 cm and 8 cm from a 30 cm wooden strip. The pieces add up to cm, so you might think cm is left over. But you make three cuts, and each uses about cm. That is cm. The leftover is cm.
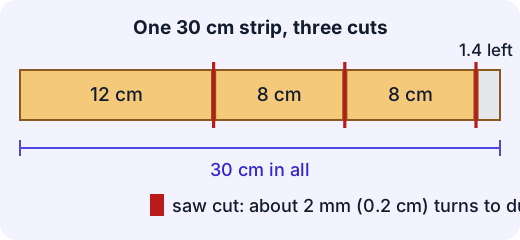
Add up before you mark. If the pieces plus the cuts need more than you have, you find out on paper rather than after sawing.
Check, then cut
Here is the whole routine in order:
- Say the length you need out loud, and write it down.
- Place the ruler with 0 at the end, and make your V mark.
- Measure again, from the other end or with a second ruler, if you can.
- Draw the line, put the X on the waste side.
- Cut on the waste side.
- Measure the piece you cut. If you need two pieces of the same size, lay the first one against the second to compare. The first piece is then your template, and it cannot disagree with itself.
A common mistake
"A tiny error does not matter." For one piece it might not. But if a box needs four sides, and each is 2 mm too long, they will not meet at the corners. Small errors add up, and the fix for all of them is the same: careful reading, sharp pencil, second look.
Now go to the ruler bench, then do the cutting for real with the offline activity.
Lab
The ruler bench
Read the length of card strips from a ruler, then slide a pencil mark to the exact spot. Watch out for strips that do not start at zero.
Your goals
- Read three strip lengths correctly, including one that starts away from zero.
- Place two pencil marks within 1 mm of the right place, including one measured from a card end that is not at zero.
The interactive lab opens once you register. Register to do this.
Activity
Measure, mark and cut
Cut a set of card strips to exact sizes, check each one, and (if you have a thin strip of soft wood and a grown-up to saw) cut one wooden piece the same way. About 40 minutes.
You'll need
- A ruler marked in centimetres and millimetres
- A sharp pencil
- Thick paper or card (an old cereal box is fine)
- Child-safe scissors
- A set square, or the corner of a book
- Optional, for the wood part - a thin strip of soft wood (balsa, a lollipop stick or an offcut of pine), a small hand saw, a clamp or bench hook, and safety glasses
Steps
- Write the cut list on paper before you touch the card: strip A 15 cm, strip B 9.5 cm, strip C 6 cm, strip D 6 cm. Add them up. Decide how long a piece of card you need, with a little extra.
- Mark strip A. Put the 0 line of the ruler at the edge of the card. Look straight down, and make a small V with its point on the 15 cm line. Make a second V near the other edge of the card, then join the marks with the ruler and a sharp pencil. Put an X on the waste side.
- Before you cut, measure again: this time put the ruler's 1 cm line at the start and read to 16 cm. Do both readings agree? If not, find out why before cutting.
- Cut on the waste side of the line so the line stays on your strip. Cut slowly, keeping the scissors square to the card.
- Measure the strip you cut. Write the real length next to the plan, for example: A planned 15 cm, got 14.9 cm.
- Repeat for strips B, C and D. Make D by laying strip C on the card as a template, drawing a line at its end and cutting on the waste side.
- Lay C and D on top of each other. How much do they differ? Ask yourself where any difference came from: the reading, the mark or the cut.
- Wood part (a grown-up saws): mark a 10 cm piece on the wooden strip in the same way, with a V and an X on the waste side. The grown-up clamps the wood and saws on the waste side of the line while you watch. Measure the piece and write down how close it is.
- Tidy up. Put the offcuts in the recycling and the pencil and ruler away.
Safety
- Hold scissors with the points down when you walk, and pass them handle first.
- Only an adult cuts or saws the wood. Wear safety glasses for the sawing and keep your hands behind the saw and away from the blade.
- Do not use a craft knife; if the card is too thick for scissors, ask an adult to cut it.
- Wood can splinter; do not run your hand along a cut end. Tell an adult about any splinter or cut.
Keeping a log of the activity is for registered learners. Register to do this.
Quick check
Measuring and marking check
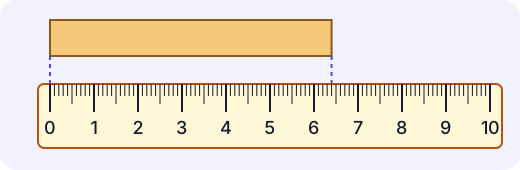
Eight questions. Read the ruler pictures slowly, to the millimetre.
1.How long is the card strip? Answer in cm.
Answer with a number
2.How long is this card strip? Answer in cm.
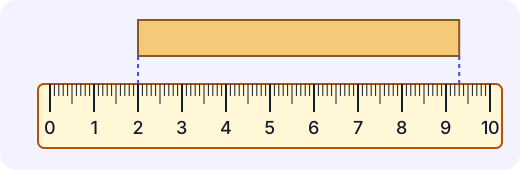
Answer with a number
3.A pencil is 14.5 cm long. How many millimetres is that?
Answer with a number
4.The end of Ria's ruler is chipped, so she starts a stick at the 1 cm line. The other end of the stick is at the 9 cm line. How long is the stick, in cm?
Answer with a number
5.You have drawn the line where a plank must be cut. Where should the saw blade go?
- Right down the middle of the line
- Just on the waste side, so the line stays on the piece you keep
- Just on the side you keep, so the piece comes out a little shorter
Choose one
6.Which of these help you make an accurate mark? Pick all that apply.
- A sharp pencil
- Looking straight down at the line you are reading
- A thick felt-tip pen, so it shows clearly
- Putting the 0 at the end (or knowing where you started)
- Marking quickly, to save time
Choose all that apply
7.Put these steps in the right order.
- Place the 0 at the end and make a V mark
- Cut on the waste side
- Write down the length you need
- Measure again to check the mark
- Draw the line and put an X on the waste side
Put these in order
8.Match each tool to its job.
- Ruler
- Sharp pencil
- Set square
- Scissors
Match each to: Measure a length · Cut card along a line · Draw a line at a right angle to an edge · Make a thin, exact mark
Answering and checking are for registered learners. Register to do this.
Quick check
New puzzles
Measuring shows up in places the lesson did not mention. Use what you know.
1.Neha has a 20 cm wooden strip. She saws off three pieces of 5 cm each, one after another from the left. Each saw cut turns 0.2 cm of wood to dust. How long is the piece that is left?
Answer with a number
2.A tailor's tape has its first 2 cm torn off, so it starts at 2. She lines up a ribbon with the 2 and its other end is at the 17.5 mark. How long is the ribbon, in cm?
Answer with a number
3.Which is longer, a screw that is 8.4 cm long or a screw that is 86 mm long?
- The 8.4 cm screw
- The 86 mm screw
- They are the same
Choose one
4.Mina's table leg measures 24.0 cm. Sam makes a second leg that must match, and he measures it as 23.7 cm. What is the best next step?
- Ignore it, 3 mm is too small to matter
- Lay the legs side by side to compare, and re-measure both starting from 0
- Cut Mina's leg down to 23.7 cm without checking anything
Choose one
5.A mark sits exactly on the longer line halfway between the 6 and the 7 on a ruler. What is its position?
- 6.5 cm
- 6.1 cm
- 6.05 cm
Choose one
Answering and checking are for registered learners. Register to do this.
Your turn
Why measure twice?
A younger child is about to cut a strip of card 12 cm long for a project. They say, "I will just draw a line and cut. A little bit off won't matter."
Write what you would tell them. Your answer must:
- Explain "measure twice, cut once" in your own words, with a real example (one from your own work if you can).
- Describe the steps you would follow to mark a 12 cm length, in the right order. Include where the ruler's zero goes, what kind of mark you make, and which side of the line the cut goes.
- Say what to check before cutting and what to do if the two measurements disagree.
How it's judged
- Explains the idea
- Steps for marking
- Checking
Writing and submitting your answer is for registered learners. Register to do this.
Like what you see?
Register for free to answer the quick checks, do the activities and save your work. Your work is saved on your device and syncs to your account.