Unit 2
Using hand tools safely
Learn the right way to hold a saw, hammer, screwdriver and hand drill, and the safety rules that keep you and your work in one piece.
Read
The right way to hold it
Imagine two children hammering a nail into the same plank. One holds the hammer right up against the head and taps with little jerky hits. The nail bends over. The other holds the hammer near the end of its handle, looks at the nail head, and swings from the elbow. The nail goes in straight in a few hits.
Same hammer, same nail, same plank. The difference is how the tool is held. Every hand tool was shaped, over hundreds of years, to be held in one way that gives the most control with the least effort. When you hold it that way, the work is better and you are safer. That is the big idea of this lesson: every tool has a right way to hold it.
You will meet four tools: the hand saw, the hammer, the screwdriver and the hand drill. First, the rules that go with all of them.
Before you start: the rules for every tool
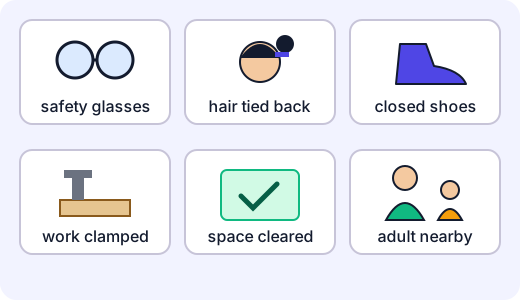
- An adult is nearby and knows what you are doing. At this age you use tools with supervision. That is not a rule to be annoyed by; even experienced makers have someone check the plan.
- Eyes protected. Wood chips, dust and bent nails fly. Wear safety glasses for sawing, hammering and drilling.
- Tie back long hair, roll up loose sleeves, and wear closed shoes. A dropped tool can land on bare toes.
- Fix the work. Clamp the wood or hold it against a bench hook (a flat board with a ledge). Never hold wood on your knee or in your hand while a tool is pointing at it. Work that cannot move cannot slip into you.
- Clear space. Nobody stands in the swing of your arm. Keep the bench tidy; a tool lying in the clutter is a hazard.
- Sharp tools are safer than blunt ones. A blunt saw needs more push, and pushing hard is when tools slip. Tell your adult if a tool feels blunt, loose or damaged.
- Carry and pass tools safely. Carry sharp ends pointing down, close to your side. Hand a tool to someone handle first.
- Stop, tell, and don't hide. If anything goes wrong (a cut, a splinter, a bent nail, a loose handle), put the tool down and tell your adult straight away.
The hand saw
A saw cuts because its teeth are bent a little to each side, so each tooth scrapes away a bit of wood and the cut (the kerf) is wider than the blade. This is why you cut on the waste side of your line, as in the measuring lesson.
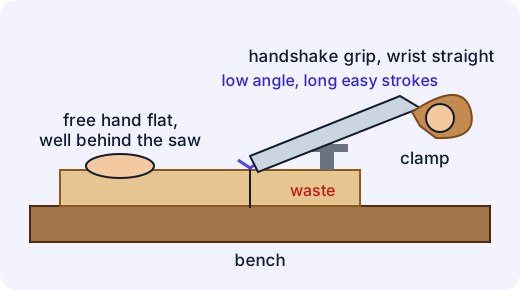
- Fix the wood so that the line you are cutting hangs just over the edge of the bench, or lies clear of the clamp.
- Grip the handle like a handshake, with your first finger pointing along the side of the handle. Keep the wrist straight.
- Lay your other hand flat on the wood, well behind the saw, and out of its path. Begin with a few light strokes drawn backwards to cut a small groove, so the saw won't jump.
- Then use long, easy strokes along the whole blade, pushing forward and pulling back at a low angle. Let the saw's weight do the work. Do not press down hard; if you press, the saw sticks.
- Near the end, slow down and support the piece that is being cut off so it doesn't split away and tear the wood.
The hammer
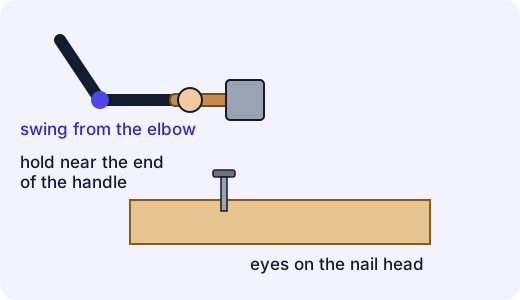
A hammer is a lever. The longer the handle you use, the faster the head moves and the harder it hits. So:
- Hold near the end of the handle for driving a nail. Holding right under the head gives a weak, wobbly hit.
- Start the nail with light taps to make it stand up. Hold a small nail steady with a folded strip of card or a pair of pliers, so your fingers are never near the head.
- Then swing from the elbow (not just the wrist), eyes on the nail head, so the flat face of the hammer meets the nail squarely. A hit off to one side bends the nail or leaves a dent.
- Check that the head is tight on the handle before every use. A loose head can fly off.
The screwdriver
A screw holds better than a nail because its thread bites into the wood. To drive one you need three things.
- The right tip. A slotted screw (one straight groove) needs a flat blade. A cross-head screw needs a cross tip. A tip that is too small or the wrong shape will slip and chew the screw head, or slip off and cut your hand.
- Push in a line with the screw as you turn, so the tip stays in the slot.
- Turn the right way. Clockwise (to the right, as seen from the handle) tightens; anticlockwise loosens: "righty-tighty, lefty-loosey".
In wood, first make a small pilot hole (see below), smaller than the screw. Keep your free hand out of the way, never in front of the tip, and clamp the wood.
The hand drill
A hand drill turns a drill bit when you turn the crank. (We use hand drills, not power drills, at this level.)
- Mark the spot and press a dent in it with a nail or bradawl so the bit won't skate sideways.
- Clamp the wood with a spare piece of wood underneath, so the bit doesn't tear the underside.
- Hold the drill straight up and down, turn the crank steadily and press gently.
- For a pilot hole, choose a bit thinner than the screw, so the thread still bites. For a 4 mm screw, a 2 mm bit works well.
- Never touch the tip of the bit, and keep fingers away from the part that holds it.
A common mistake
"I'm careful, so I don't need to bother with the clamp or glasses." Accidents are not about carelessness only. Wood slips, nails bend, a chip flies. The rules are there because things go wrong even for careful people, and the rules mean that when they do, nobody is hurt.
Try it
Try it: Take a wooden spoon (not a hammer). Gently tap a cushion with the bowl of the spoon ten times holding the handle right next to the bowl, then ten times holding the far end. In which grip does the spoon travel faster? In which do you feel more control?
Activity
The practice block
With a grown-up beside you, use a hand saw, a hammer, a hand drill and a screwdriver on scrap softwood, and make a small practice block. About 60 minutes. A grown-up must stay with you the whole time.
You'll need
- A piece of scrap softwood about 20 cm long (pine is good), with a second, shorter piece as a spare
- A small hand saw (tenon saw or junior hacksaw)
- A hammer of about 200 to 300 grams and 4 small nails (about 25 mm)
- A hand drill with a thin bit (about 2 mm) or a bradawl
- 2 cross-head wood screws (about 3.5 mm by 25 mm) and a screwdriver with a matching cross tip
- A clamp, a vice or a bench hook, and a stable bench or table that may be marked
- Safety glasses for you and the grown-up, a ruler and a pencil
- A strip of folded card, to hold nails
Steps
- Set up together. Put on safety glasses, tie back long hair, roll up sleeves and check you are wearing closed shoes. Clear the bench. Ask the grown-up to check each tool is sound: the hammer head is tight and the saw is not loose or bent.
- Mark a line across the wood 15 cm from one end, using your measuring skills. Put an X on the waste side. Clamp the wood so the line is clear of the clamp.
- Saw: grip the handle like a handshake, lay your other hand flat on the wood well behind the saw, and draw the saw backwards a few times to start the groove. Then use long, easy strokes on the waste side of the line. Slow down at the end and support the offcut. The grown-up watches your grip and corrects it.
- Nails: on the spare piece, hold a nail upright with the strip of card. Start with 2 light taps, remove the card, then swing from the elbow with your eyes on the nail head. Drive four nails. Hold the hammer near the end of its handle.
- Drill: mark two spots 4 cm apart on the practice block. Press a dent in each with a nail or bradawl. With the wood clamped, hold the drill straight up and down and turn the crank steadily. Back the bit out now and then to clear the dust. Make a hole about 15 mm deep at each spot.
- Screws: choose the screwdriver tip that fits the screw head. Hold it in line with the screw and turn clockwise to drive each screw into a hole. Then turn anticlockwise to take one out again.
- Tidy up: wipe the saw dust into a dustpan (do not blow it), put every tool back where it lives, and tell the grown-up 'all tools put away'. Wash your hands.
- Talk it over: which tool was hardest to hold the right way? Which rule made the biggest difference?
Safety
- A grown-up stays with you the whole time and does the first demonstration of every tool.
- Safety glasses on for sawing, hammering and drilling.
- The wood must be clamped. Never hold the wood in your hand, on your knee or with your foot while using a tool on it.
- Keep your free hand away from the front of the saw, the nail and the screwdriver tip.
- No power tools. Only hand tools are used at this level.
- Carry tools with sharp ends pointing down. Pass them handle first.
- If you get a cut, a splinter or a blow from a hammer, put the tool down and tell the grown-up straight away.
- Wood dust can irritate eyes and noses; do not blow it away.
Keeping a log of the activity is for registered learners. Register to do this.
Quick check
Hand tools check
Eight questions about holding and using hand tools safely.
1.To drive a nail with a strong, steady swing, which grip is best?
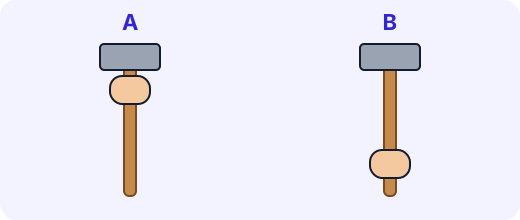
- A, the hand right under the head
- B, the hand near the end of the handle
Choose one
2.Which screwdriver tip fits this screw?
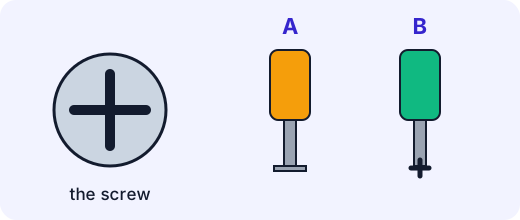
- A, the flat blade
- B, the cross tip
Choose one
3.You are about to saw a plank. What should you do first?
- Hold the plank on your knee so it is steady
- Clamp the plank, or hold it against a bench hook
- Ask a friend to hold the plank with their foot
Choose one
4.Which of these should you do before using a tool? Pick all that apply.
- Put on safety glasses
- Tie back long hair
- Make sure an adult is nearby
- Work fast so the adult does not have to wait
- Take off your shoes so you can feel the floor
Choose all that apply
5.Put these steps of sawing in the right order.
- Draw the saw backwards a few times to start a groove
- Saw with long, easy strokes, slowing at the end
- Clamp the wood
- Mark the line and put an X on the waste side
Put these in order
6.Seen from the handle end, which way do you turn a screwdriver to tighten a screw?
- Clockwise (to the right)
- Anticlockwise (to the left)
- Either way; it does not matter
Choose one
7.Why do you drill a pilot hole before driving a screw into wood?
- To make a hole wider than the screw so it drops in without turning
- To guide the screw and help stop the wood splitting
- Just to make the wood look neat
Choose one
8.Match each tool to its job.
- Hammer
- Screwdriver
- Hand drill
- Hand saw
Match each to: Cut wood along a line · Drive in nails · Turn screws in or out · Make a round hole
Answering and checking are for registered learners. Register to do this.
Quick check
New puzzles
Real workshops throw up problems the lesson did not list. Use the ideas, not just the rules.
1.Dev keeps pushing a screwdriver into a screw, but the tip slips out and scratches the wood. What should he do?
- Push much harder and turn faster
- Stop and check the tip fits the screw, then press in line with it
- Hold the wood in his free hand so he can press harder
Choose one
2.Asha has finished sawing and wants to give the saw to Tom. What is the safest way?
- Slide it across the bench to him
- Hold the blade still and hand it to him handle first
- Hand it over with the teeth pointing at him so he can see them
Choose one
3.You must drive a 6 mm screw into a plank. Which bit should you use for the pilot hole?
- 3 mm, thinner than the screw
- 6 mm, the same as the screw
- 10 mm, so the screw goes in loosely
Choose one
4.While hammering, you notice that the hammer head is wobbling on its handle. What do you do?
- Keep going; hit more gently
- Stop, put the hammer down and tell your adult
- Wrap the head with tape and carry on
Choose one
5.A nail is so short that your fingers are near the hammer head. What is a safer way to start it?
- Hold the nail upright with a folded strip of card or a pair of pliers
- Hold it very tightly between your fingertips and hit quickly
- Press it in with your thumb first
Choose one
Answering and checking are for registered learners. Register to do this.
Your turn
Teach one tool
Choose one tool: the hand saw, the hammer, the screwdriver or the hand drill.
Write a short guide for a younger child who will use it for the first time with an adult. Your guide must:
- Say what the tool is for, and describe the right way to hold it.
- Give at least three safety rules for using it (for example, where the other hand goes, what to wear, how the work is held).
- Explain why the right way to hold it is better than a wrong way, in terms of control, strength and safety.
How it's judged
- The right grip
- Safety rules
- Why it matters
Writing and submitting your answer is for registered learners. Register to do this.
Like what you see?
Register for free to answer the quick checks, do the activities and save your work. Your work is saved on your device and syncs to your account.