Unit 2
Machines and materials
Plan, measure, cut and join wood, metal or simple electrical parts so that what you build matches your plan.
Read
Measure twice, cut once
A carpenter in Jaipur makes a stool. Three legs are 40 cm long. The fourth is 40.5 cm, because the saw wandered by half a centimetre. When the stool is finished, it rocks. No amount of sanding at the top will fix it, and the leg that was cut short cannot be made longer. A half-centimetre mistake, made in a few seconds, is now part of the stool for ever.
That is why making things from wood, metal or electrical parts is about accuracy. Working to a plan means that the thing you build is the thing you drew, within a small, known margin.
Start with a plan
A good plan has four parts. Write them before you touch a tool.
- A drawing with sizes. Front and side views, each size written beside the part.
- A materials list. What, how much, and what it is made of.
- A cut list. Each piece with its exact length, and how many.
- Steps and safety. The order of work, and which steps need an adult.
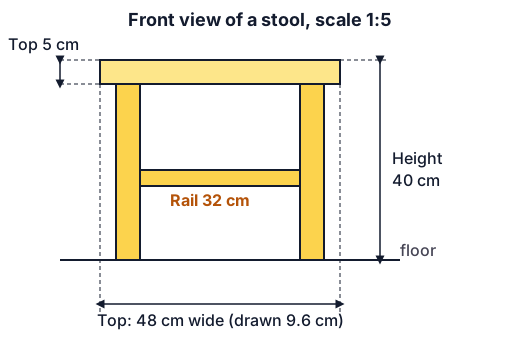
Scale
Most things are drawn smaller than real. A scale of 1:5 means 1 cm on paper stands for 5 cm in real life.
Example. The stool top is 48 cm wide. At 1:5 it is drawn cm. And if a drawn part measures 7 cm, the real part is cm.
Misconception: "I can sort out the sizes as I go." Without sizes on the plan, each piece is a guess, and guesses add up. Parts that were each "about right" can leave a gap you can't close.
The saw eats wood
A saw does not split a board along your line; it removes a thin strip of wood, the kerf, typically 1 to 3 mm for a hand saw. You must include that in your sums.
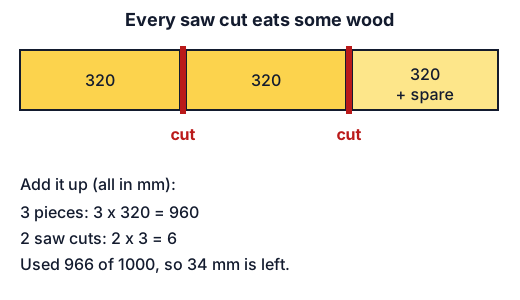
Example. Can you cut three pieces of 320 mm from a 1000 mm board if each saw cut wastes 3 mm?
- Pieces: mm.
- Cuts between three pieces: 2, so mm.
- Total: mm, which is under 1000, so yes, with mm left.
Count carefully: three pieces need two cuts, not three. (The cut that trims the end is extra.)
Mark with a pencil and a try square (a tool for right angles). Saw on the waste side of the line, so the line itself stays on your piece. Then file or sand down to the line. You can always take a little more off; you can never put it back.
Know your material
Wood. It has a grain, like fibres running along the plank. It cuts and splits more easily along the grain. Softwoods such as pine are easy to work; hardwoods such as sal or teak are stronger and slower to cut. Drill a small pilot hole before a screw so the wood does not split.
Metal. Thin sheet can be cut with tin snips. Cut edges are razor sharp, so file off the sharp burr and wear gloves. To drill metal, first dent the spot with a centre punch so the drill does not skid. Clamp the work; never hold it by hand.
Electrical parts. At this level, work only with batteries (9 V or less), never the mains socket. A circuit is a loop: current flows only if the loop is unbroken, from the battery, through the parts, and back.
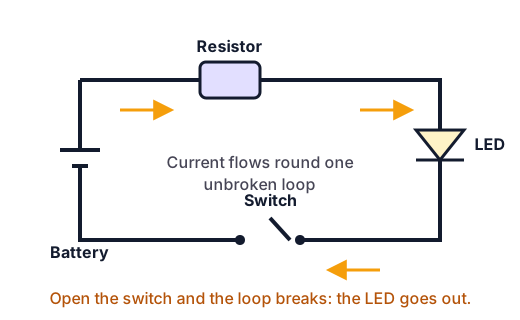
An LED can burn out if too much current flows, so a resistor is put in series with it. The resistor's value comes from this rule:
Example. A 6 V battery pack, an LED that drops 2 V, and a safe current of 20 mA (0.02 A):
You would use the next standard value up (220 Ω). Ask your teacher for the values for your own LED, because they vary.
Work in a sensible order
- Draw and check the plan.
- List materials and the cut list.
- Measure and mark each piece.
- Cut, then file or sand to the line.
- Join and assemble (screws, glue, solder or twist joints) dry first, without glue, to see if the parts fit.
- Test, and check each size against the plan.
If you spot a mistake, stop. Ask: what caused it (did I measure from the wrong edge?), can it be repaired or must the piece be remade, and are the other marks still right? Write the change on your plan. Do not quietly carry on.
Safety is part of accuracy
- Clamp the work. A piece you hold in one hand is a piece you may cut.
- Cut away from your body, with your other hand behind the blade.
- Wear eye protection when you drill, file or cut metal.
- Hammers, saws, drills and soldering irons: an adult is present and gives permission.
- Tie back long hair, roll sleeves, and keep your bench tidy.
Repairing counts
You may repair something instead of building new: a wobbly chair, a broken torch, a loose hinge. The method is the same. First draw or list what is wrong and what the right state looks like, then measure, then fix to that target and test.
What you take away
Working to a plan means accuracy: sizes written down before work, measurements checked twice, allowance for the saw and care in order, so that parts made one at a time fit together at the end.
Activity
Build or repair to a plan
Plan and then build (or repair) one small object using wood, metal or simple battery parts, for example a pencil box, a bird feeder, a small stool, a hinged lid or a battery torch. Allow about 2 hours for the plan and 3 to 5 hours for the work over several sessions, with an adult present for all tool use.
You'll need
- Paper, pencil, ruler and eraser for your plan
- Wood: offcuts or a strip of softwood, a hand saw, a try square, sandpaper, a clamp, screws or nails, a hammer or screwdriver
- Metal (optional): thin sheet or wire, tin snips, a file, gloves
- Electrical (optional): a battery pack of 9 V or less, an LED and a matching resistor, a switch, wire
- Eye protection and a tidy bench or table
Steps
- Choose the thing and talk it over with an adult. It should be small enough to finish in the time.
- Draw the plan at a scale you choose (1:1 or 1:5), with every size written next to the part. Add a materials list and a cut list.
- Work out your cut list sums, including the saw kerf (for example, three 320 mm pieces and two cuts of 3 mm need 966 mm). Check you have enough material.
- Have an adult check your plan before you touch a tool.
- Measure twice and mark each piece with a pencil. Check right angles with a try square.
- Clamp the work. With the adult present, saw on the waste side of the line. File or sand to the line and remove sharp burrs.
- Lay the parts out dry and compare them with the plan. Fix any parts that do not fit before you join them.
- Assemble. For electrical parts, build the circuit as one loop and test it before closing it into a box.
- Measure the finished object and compare each size with the plan. Write the differences in millimetres.
- Write a short review: what matched the plan, what did not, why, and what you would do differently.
Safety
- An adult is present for every use of a saw, drill, hammer, soldering iron or snips. Tools are put away after use.
- Clamp the work. Never hold a small piece in your hand to cut or drill it.
- Wear eye protection when you cut, drill or file. Wear gloves for sheet metal and file off sharp edges.
- Use batteries of 9 V or less only. Never touch the mains, a plug socket or an appliance cord. Never short-circuit a battery with a bare wire (it can get hot).
- Soldering (only if your adult says so): the adult does or closely supervises it; the iron is hot enough to burn, so rest it in its stand, work in a ventilated room and do not breathe the fumes. Twist joints or screw terminals are a safer choice.
- Wood dust and metal filings: sweep up, do not blow them, and wash hands after the work.
- Tie back hair, roll up sleeves and keep bare toes away from the work area.
Keeping a log of the activity is for registered learners. Register to do this.
Quick check
Machines and materials check
Eight questions on working to a plan.
1.A plan is drawn at scale 1:5. A part measures 7 cm on the drawing. How long is the real part, in cm?
Answer with a number
2.You cut three 320 mm pieces from a 1000 mm board. Each saw cut wastes 3 mm. How many mm of board are left over? (Ignore trimming the ends.)
Answer with a number
3.Where should the saw blade run when you cut along a pencil line?
- On the waste side of the line, leaving the line on your piece
- Exactly down the middle of the line
- On the side of the piece you want to keep
Choose one
4.Put the work in a sensible order.
- Write the materials and cut list
- Cut and smooth to the line
- Fit dry, assemble and test
- Draw the plan with sizes
- Measure and mark
Put these in order
5.Which of these are safe practice?
- Clamp the work before sawing or drilling
- Hold a small piece in one hand while you saw it
- File the sharp burr off a cut metal edge
- Build your own circuits using a battery of 9 V or less, not the mains
- Test a circuit by plugging it into a wall socket
Choose all that apply
6.Match each tool to its job.
- Tin snips
- Try square
- Centre punch
- File
Match each to: Making a dent so a drill does not skid · Marking and checking a right angle · Cutting thin sheet metal · Smoothing a rough or sharp edge
7.A 6 V battery pack drives an LED that drops 2 V, at 20 mA (0.02 A). Using R = (supply - LED) / I, what resistor value in ohms is needed?
Answer with a number
8.A stool rocks because one leg is 5 mm longer than the others. What does this show?
- Small errors in one part show up in the finished object, so accuracy matters at every stage.
- Stools always rock a little.
- The seat was too thick.
Choose one
Answering and checking are for registered learners. Register to do this.
Quick check
New puzzles on machines and materials
Four situations the reading did not show.
1.A shelf bracket is 45 cm long. You draw it at scale 1:10. How long is the drawing, in cm?
Answer with a number
2.Your torch circuit has a fresh battery, but the LED does not light. Which check should you make first?
- Look for a loose wire, a switch that is not making contact, or a gap, anywhere in the loop.
- Swap to a 230 V mains supply for more power.
- Replace the wires with thicker ones before looking at anything else.
Choose one
3.You need 4 stool legs of 450 mm from a 2000 mm strip. Each saw cut wastes 3 mm. You make 3 cuts (the last leg is the end of the strip). How many mm are left over?
Answer with a number
4.Your plan says a hole is 16 cm from the edge. You drill it 6 cm from the edge. What is the best response?
- Carry on, and hope the rest will still fit.
- Stop, find out why (perhaps you measured from the wrong edge), decide whether to repair or remake, check the other marks, and note the change on the plan.
- Mark every other hole by eye from now on.
Choose one
Answering and checking are for registered learners. Register to do this.
Your turn
Explain what accuracy did for your build
Use your own build or repair if you did one; otherwise use the stool in the reading.
- Explain in your own words what "working to a plan means accuracy" means. Give one example of an error made early that showed up at the end.
- Show the sums for a cut list: three pieces of 250 mm from a 1000 mm board with 3 mm saw cuts. How much is left?
- Describe what you would do on finding a measurement was wrong, and what you would write on your plan.
How it's judged
- Meaning of accuracy
- Cut list sums
- Handling mistakes
Writing and submitting your answer is for registered learners. Register to do this.
Like what you see?
Register for free to answer the quick checks, do the activities and save your work. Your work is saved on your device and syncs to your account.